Menu
Menu
Customer Docs
Looking for a reliable and secure way to accept online payments? ChillPay is here to help your business grow with seamless payment solutions.
Register
📝 Registration (Register)
You can register for ChillPay services at www.chillpay.co- Click the “Sign Up” button
- Fill in the following information: Company/Individual Name, Phone Number, Email, Password, and Confirm Password
- Select “Accept Terms and Policies”
- Click “Register”
Login
🔐 Login
- Go to www.chillpay.co and click “Login”
- Enter your email and password
- After a successful login, your username will be displayed at the top corner of the website
Forget Password
❓ Forgot Password
- Go to the login page > select “Forgot Password”
- Enter the registered email address and click confirm
- The system will send an email with a “RESET PASSWORD” button
- Click the link to set a new password, then log in again
User Profile
👤 User Profile
Users can edit basic information such as:- Profile picture
- First and Last Name
- Address
- Line ID
- Enable/Disable Two-Factor Authentication (2FA)
2 Authentication
🔐 Two-Factor Authentication (2FA)
2FA is a security system that requires two steps to log in.- Enable 2FA on the user profile page.
- When logging in, the system will send a 6-digit OTP to your email.
- You must enter the OTP in order to access the system.
Change Password
🔄 Change Password
You can change your password via the “Change Password” menu by entering:- Current password
- New password
- Confirm new password
User Manage - Users
👥 User Management (User Manage – Users)
You can add user accounts for team members in the system by:- Clicking the “Add User” button
- Entering information such as:
- Roles
- Status (Active / Inactive)
- Full Name
- Password
- Clicking the “Create Account” button
- Edit password
- Assign access permissions
- Delete user
User Manage - Roles
🛡️ User Role Management (User Manage – Roles)
Used to define “Roles” and “Permissions” for each user’s system access.- Click “Add Role”
- Enter the role name (Name) and description (Description)
- Click “Create Roles”
- Granted: Access allowed
- Denied: Access not allowed
Merchant Profile
🏪 Merchant Profile
In the Merchant Profile section, merchants can edit basic information depending on the account type.🔹 In case of a Corporate Account
- Name registered according to the company registration certificate
- Trade name
- Company logo
- Taxpayer Identification Number
🔹 In case of a Personal Account
- Name as shown on the national ID card
- Trade name
- National ID number
Dashboard
 Dashboard
The dashboard is an overview page of all transactions in the system. It displays important merchant information including:
- Sales Report
- Transaction Summary
- Transaction Amount
- Usage Overview
 How to Access
Click the username at the top left corner of the screen and select the “Dashboard” menu.
 Main Components on the Dashboard
- Section 1: Transaction Summary
- Section 2: Top 5 Transaction Channels
- Section 3: Transaction Amount
- Section 4: Channel Percentage / per transaction
- Section 5: News & Events
- Section 6: Latest Transaction
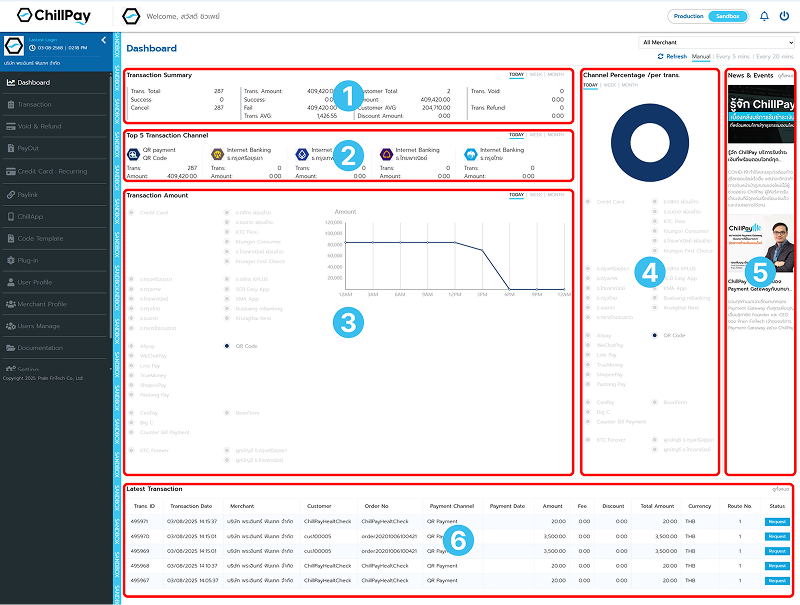
Refresh
🔄 Refresh Button on Dashboard
Merchants can configure the data refresh settings on the dashboard to view the most recent data. The setting is located at the top right corner of the dashboard page. Data refresh options:- Refresh Manual: Refresh only when the user clicks the Refresh button manually
- Refresh Every 5 mins: System auto-refreshes every 5 minutes
- Refresh Every 20 mins: System auto-refreshes every 20 minutes
- Refresh Every 1 hr.: System auto-refreshes every 1 hour
Payment Transaction
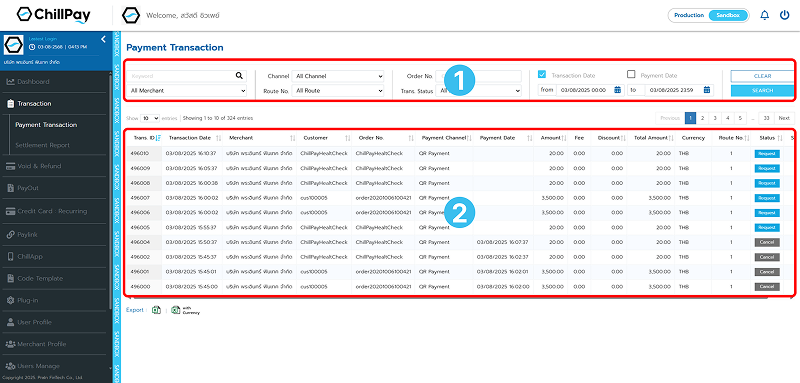
💰 Payment Transaction
Used to check payment transactions made by customers (End-users) to the merchant. Users can:- Filter transactions based on various criteria to match specific needs
- View results in real-time
- Download transactions as an Excel file
📌 Components of the Payment Transaction Page
- Section 1: Used to configure search filters, such as:
- Payment channel (Channel)
- Order type
- Transaction status
- Transaction date / Payment date range
- Section 2: Displays the filtered result list, such as:
- Transaction ID
- Product name / Customer / Channel / Transaction date
- Amount / Fee / Net amount
- Currency / Transaction status
Settlement Report
💼 Settlement Report
Used to view the settlement reports of transfers made by ChillPay to the merchant.- Search filters allow for precise viewing of desired records
- Data can be downloaded as an Excel or PDF file
🔍 Components of the Settlement Report Page
- Section 1: Used to configure filters to search for specific reports, such as:
- Account type
- Payment channel
- Transaction status
- Settlement date range
- Section 2: Displays the settlement report results, such as:
- Transfer date / Amount / Fee / Net amount
- Channel / Currency / Status
Void & Refund
🧾 Void
If the user wishes to cancel a full payment transaction, this can be done via the Void menu. Void means canceling the transaction before the daily settlement time. The available time for voiding depends on the policy of each payment channel provider.🔄 Steps to Perform a Void Transaction
- Select the transaction you want to void
- Once selected, click the Void Transaction button
- The system will display your selected transaction again for verification. Click Void Transaction again to confirm
- Once confirmed, the system will notify Transaction Successful and the transaction status will change to Voided
Void & Refund
🔁 Refund
A function to request a refund for the customer when a payment has been made and needs to be canceled and refunded. The process is carried out through the ChillPay backend system.📝 Steps to Perform a Refund Transaction
- Select the transaction you want to refund
- Once selected, click the Refund Transaction button
- The system will display the selected transaction again for verification. Then, click Refund Transaction once more to confirm
- The system will show a confirmation message for the refund request and ask for confirmation to proceed. The merchant will receive an email with refund terms within 1 business day
- Once the request is successfully received by the system, the transaction status will change to Refund Requested
- When the merchant responds and confirms the refund agreement, the system will change the transaction status to Refunded
Credit Card : Recurring
💳 Credit Card : Recurring
Refers to an automatic credit card charge service on a recurring basis, such as monthly or annually, without requiring the customer to manually perform the transaction each time. The business will charge the customer’s credit card on the due date of each billing cycle. Suitable for businesses that offer subscription-based services or recurring expenses, such as:- Streaming services
- Subscription-based software
- Insurance premiums
- Fitness service fees
- Or other monthly service fees
Paylink List
🔗 Paylink List
For users of Paylink, this section displays details of the payment links that have been created to receive payments from customers through social channels.📌 Main Components
- Section 1: For searching payment links, which can be filtered based on the desired criteria
- Section 2: Displays the list of all created links along with detailed information on the screen
📄 Table Information Details
- Link. ID: The ID number of the payment link
- Product: Name of the product/service
- Amount: Price of the product/service
- Currency: Currency type
- Added Date: Date and time the link was created
- Number of Uses: Number of times the link has been used
- Is Multiple: Indicates whether this link can be used multiple times
- Status: Status of the link
- Delete: Delete the payment link
Paylink : Transection
📄 Transaction
For users to view the payment link transaction report, the system displays all transaction details in real-time.📌 Components of the Transaction Page
- Section 1: Search for desired transactions by filtering with date range, channel, status, and other keywords
- Section 2: Displays the list of found transactions with detailed information
📑 Details of Each Transaction Displayed on Screen
- Trans. ID: Transaction number
- Transaction Date: Date and time of the transaction
- Product: Name of product/service
- Customer: Customer name
- Phone Number: Customer’s phone number
- Amount: Price of product/service
- Fee: Transaction fee
- Net Amount: Net total amount
- Currency: Currency type
- Status: Transaction status
Paylink : Add new
➕ Add New Link
For users to create a payment link (Paylink) to receive payments from customers via social channels. When creating a payment link, users must complete the product or service details as listed below.📌 Required Information
- Currency: Specify the currency used for the product/service
- Amount: Enter the price of the product or service
- Product Image: Upload a product image (jpg or png only, max size 2MB)
- Product/Service Name: Enter a name to display on the payment page
- Description: Provide a clear explanation of the product/service
- Link Expiration Period: Specify the period during which the link can be used
- Multiple Payments: Choose whether this link can be used multiple times or only once (enter 0 for unlimited use)
✅ Saving and Display
After completing the details, click the Save button. The system will generate a payment link and display it on the Paylink List page. To view the details of a created link, click the Link. ID of the desired item. The system will display the full details of that link on the detailed listing page.Code Template
📄 Code Template
For users integrating via the Code Template method, you can simply copy the pre-configured HTML template provided by the system and embed it directly into your website. This method is suitable for cases where you do not wish to install plugins or integrate via API. You can select your desired payment channels, and the system will generate a ready-to-use HTML code for you to copy and apply immediately. ✅ Supports a variety of payment methods such as credit/debit cards, PromptPay, counter service, QR code, and more.
					<!DOCTYPE html>
<html>
<head>
<meta charset="utf-8" />
<meta name="viewport" content="width=device-width, initial-scale=1.0" />
<title>Payment Demo</title>
</head>
<body>
<form id="payment-form" action="https://sandbox-cdnv3.chillpay.co/Payment/" method="post" role="form" class="form-horizontal">
<modernpay:widget id="modernpay-widget-container"
data-merchantid="M000001" data-amount="10000" data-orderno="00000001" data-customerid="123456"
data-mobileno="0889999999" data-clientip="184.22.101.13" data-routeno="1" data-currency="764"
data-description="Test Payment" data-apikey="2aJDExXygTPEKk8oRezTJZgsMcHtLb4ZO7gw88X4ZXB50T2t43Ovg2WJVE6u72kL">
</modernpay:widget>
<button type="submit" id="btnSubmit" value="Submit" class="btn">Payment</button>
</form>
<script async src="https://sandbox-cdnv3.chillpay.co/js/widgets.js?v=1.00" charset="utf-8"></script>
</body>
</html>
Plug-in
🔌 Plug-in
For WordPress – WooCommerce users, you can view the installation steps and download the ChillPay WooCommerce plugin to start using the system immediately. The system displays the Parameter and MD5 Secret Key for users to directly use in the integration. Ideal for merchants using WooCommerce version 3.5.5 or higher and who want a quick and easy integration with ChillPay without custom development.- ✅ Supports Sandbox mode setup
- ✅ Supports enabling/disabling specific payment channels
- ✅ Includes Result and Background URLs ready for copy-paste use
🔄 Installation Steps
- Install the WooCommerce Plugin version 3.5.5 or higher
- Download the Plugin: ChillPay WooCommerce
- Upload the Plugin downloaded from step 2 to WordPress
- After installation, go to the ChillPay menu to configure settings
- If you want to use Sandbox Mode, check “Enable to using Sandbox”
- Fill in the Merchant Code / API Key / MD5 Secret Key fields to match your ChillPay system settings
- If multiple Routes exist, specify the correct Route to be used
- Select the preferred language to display on the payment page
- Click Save Settings to save the configuration
- The website will then display the available Payment Channels
- Click Config on the channel you want to enable, then select Enable
- The system will display the Background URL and Result URL to be entered into the ChillPay system
Setting : API
🛠️ API
For users integrating via API, you can directly generate a new API Key and MD5 Key from this page.- ✅ Users can click Generate API Key to immediately create a new key
- ✅ If you want to generate an MD5 Key for additional encryption, you can click Generate under the relevant section
- 📋 Copy the API Key / MD5 Key to use in external systems directly
Setting : Payment Channel
🌐 Payment Channel
Users can check the available payment channels and the display result URLs on the Payment Channel page. Users can view various payment options by selecting the desired type. If there are any payment channels that the user does not wish to display on the checkout page, they may disable those channels as needed.- ✅ Supports multiple channels such as credit card, PromptPay, internet banking, etc.
- ✅ Displays the fields URL Result and URL Background for direct copying and use
- ✅ Users can enable/disable each payment channel by themselves
Setting : Payment Fee
💰 Payment Fee
For checking the transaction fees of each payment channel, including payment requirements such as minimum and maximum transaction amounts, fees, and other related conditions. Users can check the fees for each channel by selecting the desired payment method.- ✅ Displays the fee charged to the customer
- ✅ Displays the minimum-maximum amount supported per channel
- ✅ Supports multiple currencies such as THB, USD, JPY, etc.